Author: Abhineet Mittal

  • Prevent Form Resubmission on Page Refresh

    We face a common issue on many websites that whenever a form submits to the same page, and then we refresh the page, the form data is submitted again. Sometimes the browser asks for confirmation, sometimes it does not. It becomes really frustrating if it causes an operation to happen twice.

    To prevent this on our website, all we need to do is add a small Javascript code snippet, and the form resubmission issue will be gone.

    Here is the code-

    <script>
    if ( window.history.replaceState ) {
    window.history.replaceState( null, null, window.location.href );
    }
    </script>

  • Prevent Memory Leak in WordPress

    Recently I faced an issue of memory leak in one of my WordPress projects. I was running a function that was reading post meta and user metadata of thousands of objects. I thought reading data from MySQL is cheap in terms of processing power and memory, but it turned out it was causing my function to crash giving an out-of-memory error.

    I made sure that there was no update being done to either post meta or user meta. It was only reading data through get_user_meta() and get_post_meta() functions. Then what was the reason for the memory leak?

    It turned out that WordPress caches all the results when we read or write to post and user meta. That’s why, on iterating through thousands of posts and users, the result of each was being cached in memory, thus resulting in out-of-memory error.

    To fix this issue, we need to prevent WordPress from caching this data. This can be done through wp_suspend_cache_addition(). This function disables the cache addition for the current page execution. This is how we need to call this function at the start of our script.

    wp_suspend_cache_addition( true );

    And that’s it. Memory usage dropped to less than 6 MB with peak memory usage coming down to mere 13 MB.

    If you are facing a similar issue in WordPress, do remember this function. Also, while writing cron scripts or scripts to bulk update data like import/export scripts, it is better to call this function to ensure there is no out-of-memory issue.

  • Fix Indentation Issue in Visual Studio Code

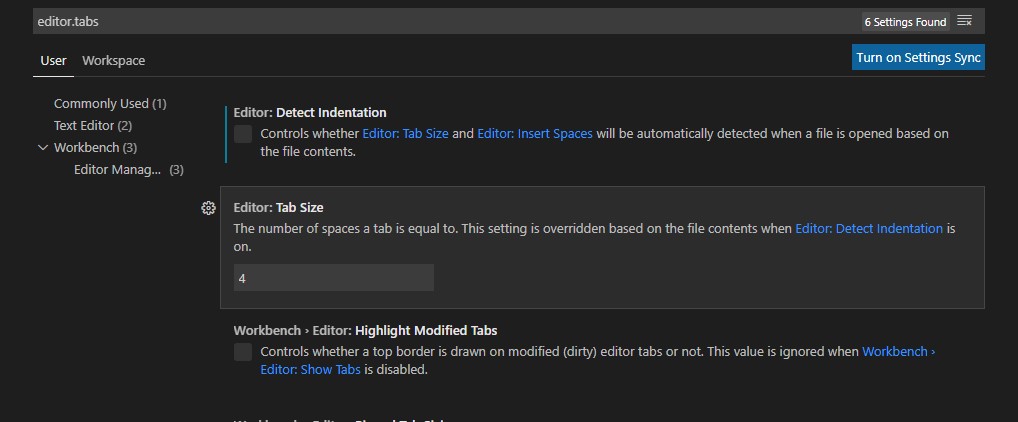
    In Visual Studio Code, there is a setting to fix tab size to 4 spaces thus making it uniform for all files. It can be set to any value as per the user’s choice. This setting can be modified in settings-> editor.tabSize.

    But whenever VS Code opens a file, it also checks for the default indentation in that file, and tab size can be overridden for that particular file. Many times this results in different tab sizes in different files thus making the code non-uniform.

    Visual Studio Code Tab Size Settings

    To fix this issue, there is another setting to override this per file indentation. It is editor.detectIndentation (Editor: Detect Indentation). Just turn it off and VS Code will start using universal tab size value instead of file-wise tab size assumptions.

  • Correct Way to Manage Title Tags in WordPress

    The title tag is a very important feature of any website. It is displayed at the top of browser tabs and also read by search engines. So, it should be clear to read as well as SEO friendly.

    WordPress is so powerful that it has customization options for almost anything in its structure. The title tag is no exception to this. However, while creating a WordPress theme, what is the best way to generate or modify title tags?

    The earlier method was to include title tag in WordPress head using wp_title() function. But this method was supposed to be deprecated in WordPress version 4.4, but was kept for backward compatibility.

    So, you should not use wp_title() as sooner or later it will be deprecated and removed.

    Starting WordPress version 4.1, the recommended way to add title tag is to declare ‘title-tag’ compatibility in the theme itself. You can do this using the following code snippet.

    add_theme_support( 'title-tag' );

    This code will ensure that title tags are automatically added to the head of all HTML pages (posts, pages, archives, etc.). The format of the title tag is also automatically decided by WordPress. Here is the default structure of the title tags based on the current page-

    Home Page- <Site Name><Separator><Site Tagline>

    Posts- <Post Title><Separator><Site Name>

    Pages- <Page Title><Separator><Site Name>

    Archives- <Archive Title><Separator><Site Name>

    And similarly all other WordPress generated pages will get automatic title tags.

    The values of Site Name and Site Tagline are those which we define in Settings > General.

    You can add theme support directly in the theme if you are creating one. Or, you can create a child theme and add this code in its functions.php file.

    If you are declaring theme support in a plugin, then use the action hook after_setup_theme to ensure that theme support is added once all the plugins and themes are loaded.

    If you are undecided about where to add your code, I have a very good article about where to add custom code in WordPress.

    Now, this structure is perfect for most websites and good for SEO. However, in certain scenarios, we may need to modify the title tag.

    To do that, WordPress has a filter hook document_title_parts using which we can hook into the title tag generating function and modify it dynamically.

    Following is an example snippet of code to do that-

    add_filter( 'document_title_parts', 'modify_title_on_home_page' );
    function modify_title_on_home_page( $title_array ) {
        $title_array ['title'] = 'Modified Page Title';
    }

    This code modifies the page title on the home page of a WordPress website.

    The document_title_parts filter passes an array containing the title of the current page, page number (in case of paginated pages), site tagline, and site title/name which we can modify and return back.

    And that’s it. You are now ready to utilize the power of WordPress to manage the title tags efficiently.

  • Resolved: Graphics Processor Not Detected in Photoshop

    I installed a new version of Photoshop and, suddenly, it was chaos all around. Photoshop started getting crashed even if there was a small graphic-intensive operation and closed automatically without even giving me a chance to save my work.

    On restarting the application, it was throwing an error message that it disabled enhancements which use the graphics hardware due to some issue with the graphic driver. In Preference>Performance settings, I could see that the Graphics card was not detected and it was turned off, but the software would keep crashing again and again.

    I checked the Windows device manager to update the driver software, and it showed that I already had the latest driver installed.

    On some user forums, I found that it was a known issue in the latest update of Photoshop, and installing a previous release would solve the issue. I uninstalled the current version and installed an earlier release. But it was futile, the problem persisted.

    Then I thought of checking with the graphics card support. I have a decent 2 GB AMD Radeon card which is good enough for moderate Photoshop usage. AMD has a very simple driver update system where their tool will automatically identify the graphics card installed on your system and will update it.

    Once the update was done, it asked for a restart. And, problem solved.

    Photoshop was now able to detect my graphics card and there were no more crashes.

    If you are facing a similar issue, try updating the graphics card drivers from the manufacturer’s website and it should solve the problem.

  • Why some recipients are not getting your emails?

    If you are using email on your custom domain using some email service like Google Workplace or Zoho Mail, you have to do certain configurations to ensure that your emails reach the inboxes of their recipients. Missing emails can be disastrous for a business.

    The most important configurations are SPF and DKIM in your DNS, which authenticate your outgoing emails so that recipient servers do not mark them as phishing or spam emails.

    All email providers provide the settings for SPF and DKIM authentication. You have to add their provided records to your DNS settings.

    Please note that there can be only one SPF record. In case you are configuring your domain to send emails through multiple providers, add their data in the same SPF record.

  • Decode a PHP encoded string url in Javascript

    Sometimes you may face a problem when you have to decode a string with Javascript which was originally url encoded with PHP. This can be an API response or cookie set by PHP setcookie function.

    A simple way to do this is through decodeURIComponent function in Javascript. But it leaves the "+" signs in the string. For that we can use replace function to replace all the "+" signs with space. Remember, simply using replace function sign will only replace the first occurrence in the string. To replace all the occurrences, use the regex version with g flag.

    Here is the code for your reference-

    var decodedString = decodeURIComponent( encodedString ).replace( /+/g, ' ' );

    Here encodedString is the url encoded string received from PHP.

    Its that simple!

    If you have any other method, do share in comments.

    Happy coding!

  • How to change Post Type in WordPress

    While working with custom post types in WordPress, many times we come across the need to change the post type of a particular post.

    It can be done either directly through code or using a plugin.

    Without Plugin

    This can be done using WordPress functions- wp_update_post or set_post_type.

    wp_update_post can be used when updating multiple fields of a post.

    In case, only post type has to be changed, then set_post_type is sufficient.

    Just use set_post_type along with the post id and you are done.

    If you are unsure about where to add this code, take a look at Where to add custom code in WordPress.

    Using Plugin

    If you occasionally want to switch posts and do not want to fiddle with the code, there is a good plugin for this which easily performs this task- Post Type Switcher.

    Simply install and activate a plugin. It will add the option to change post types in the admin menu.

    A good thing about this plugin is that it allows to change the post type of multiple posts in bulk by utilizing the "bulk edit" feature in WordPress.

    So, now you know how to change post type with or without a plugin. Which one do you like better? Do let me know in comments section.

  • How to view and modify WordPress rewrite rules

    If you encounter a sudden unexpected delay in page load which was previously working fine, a good place to check is the rewrite rules.

    In my case, it seems there was some issue in the currently generated rules which was causing this delay.

    A simple visit to Settings->Permalink automatically flushed and regenerated all the rewrite rules and it resolved the issue for me. The page is again loading as fast as it did earlier.

    However, if you want to check the current rewrite rules, there is a simple code to check that.

    Add the below code to your plugin or theme.

    // Filter to display rewrite rules on permalink settings page when debugging 
    add_filter( 'rewrite_rules_array', 'show_all_the_rewrite_rules' );
    function show_all_the_rewrite_rules( $rules ) {
        echo nl2br( var_export( $rules, true ) );
        die;
    }

    Now this hook is only called on Permalink Settings page. So, visit that page and you will be able to see all the current rewrite rules of your website.

    You can also remove rules if they are not required, based on regex as shown in the following code.

    // Filter hook to remove unwanted rewrite rules, will only run when **setting->permalink** page is opened
    function remove_rewrite_rules( $rules ) {
        foreach ( $rules as $rule => $rewrite ) {
            if ( preg_match( '/(feed|rss|atom|embed|attachment|trackback|year|date|search/)/', $rule ) ) {
                unset( $rules[$rule] );
            }
        }
    
        return $rules;
    }

    You can define any pattern in the preg_match function to remove the unwanted rewrite rules.

    Hope this helps.

  • How to replace Paragraph Break with Line Break in LibreOffice Writer

    In Microsoft Word, this is very easy. You just need to open “Find and Replace”, enable Wildcards and replace ^13 (paragraph break) with ^l (line break).

    But this is a little different in LibreOffice Writer. But you do not require any macro for this. Just follow this process.

    • First of all, type a line break by pressing “Shift” + “Enter”
    • Now copy this line break
    • Now open “Find and Replace” (You can use the shortcut “ctrl” + “H” to open “Find and Replace” dialogue box)
    • Click on checkbox for Regular Expressions
    • Type “$” in the find box to search for paragraph break
    • Click on “Find All”. This will cause all the paragraph breaks in the document to get selected
    • Close the “Find and Replace” box without removing the selection
    • Press “ctrl” + “V” and it will paste line break in place of all the paragraph breaks

    That’s it.

  • Whitelist all sub-sites for wp_safe_redirect in WordPress Multisite

    In WordPress, there are two functions for redirecting a page- wp_redirect and wp_safe_redirect.

    wp_redirect can be used to redirect to any url.

    wp_safe_redirect can only redirect to current site. In case any external url is provided, the page is redirected to wp-admin.

    For security, it is recommended to use wp_safe_redirect function for any redirects. This works fine for single WordPress installation. But in case of subdomain based WordPress multisite, this fails because each sub-domain is an individual domain for wp_safe_redirect.

    What if we want to use wp_safe_redirect to redirect our pages only within network and not outside?

    For this purpose, WordPress has a filter to add additional domains to the wp_safe_redirect whitelist. You can add any domain or sub-domain, internal or external, through this method.

    In this article, we will focus on how to whitelist all the sub-domains of a network.

    Just add the following code to your custom plugin or child theme’s function.php file.

    // Filter to add all subdomains to wp_safe_redirect whitelist
    add_filter( 'allowed_redirect_hosts', 'whitelist_all_subdomains' );
    
    function whitelist_all_subdomains( $hosts ) {
        $sites = get_sites();
        $domains = array();
    
        foreach ( $sites as $site ) {
            $domains[] = $site->domain;
        }
    
        return array_merge( $hosts, $domains );
    }

    This code gets all the sites through get_sites function and iterates all the sites to create an array of all domains/sub-domains of sub-sites. It then adds that to the whitelist.

    If you try now, you will see that page redirects across sub-sites of a network using "wp_safe_redirect" are flawless.

  • Make Javascript sequential with “async” and “await”

    Most of the older programming languages are sequential in nature. That means, when the code runs, it is executed line by line. If there is a function call, the next line is executed only when the function has been executed and returned control. This is blocking in nature and helps programmers easily predict the output of their code.

    But when we move to async languages like Javascript, code is non-blocking in nature. That means, execution does not wait for any function to return response. This is good for performance, but creates a problem when the next line of code requires output from the function call made in previous line.

    To solve this problem, Javascript provides Promises. Promises allow us to write a callback function to process the response of the called function. But their syntax requires to write another function to handle the response. Also, if there are multiple functions, it may lead to callback hell.

    The syntax of a function returning a promise is:

    function add(a, b) {
        return new Promise(function(resolve, reject) {
            resolve(a+b);
        });
    }

    And this is how we handle the returned Promise:

    add(2,3).then(function(response) {
        console.log(response);
    }

    This becomes cumbersome if there are a lot of function calls nested inside one another. To simplify this code, there are two keywords in Javascript to write promises in a very simple way- async and await.

    async

    async can be placed before a function definition. It means that the function will always return a promise. If the returned value is not a promise, it will wrap it in a promise and return.

    async function demoFunction() {
        return 1;
    }

    await

    await can be placed before any line of code to ensure that Javascript hold the execution till that line is executed. If there is a function call in that line, Javascript is wait till the function returns a response.

    async function demoFunction() {
        let sum = await add(a, b);
        console.log(sum);
    }

    In the above example, we are calling a function called add and saving its value in a variable called sum. The await ensures that the next line is executed only after we get the value returned from the function add. If we remove the await keyword from this, console.log may print an empty variable.

    So, even if the called function is returning a promise, there is no need of defining any callback function. Just simply store its return value in a variable and process it in the next line of code. This is pretty much like we do stuff in C or PHP.

    Note: await can only be used inside an async function.

    This is such a simple syntax that can easily make Javascript code sequential whenever needed.

    To read the detailed description of these keywords, you can refer to the following articles:

  • Javascript: Loop over querySelectorAll without error

    Javascript: Loop over querySelectorAll without error

    In Javascript, there are a lot of instances when you want to find multiple elements on a page to apply a common operation to all of them.

    Suppose you want to hide elements of a particular class present on your web page. To do this, first get an array of all such elements using querySelectorAll and then loop through that array items to change the display property of all such elements.

    But there is an issue. querySelectorAll also returns additional data, a static NodeList. If you iterate through all the items, you will hit the static NodeList which will give error.

    So, what is the solution for this?

    First, find the number of elements found matching the given selector using length property. Then use a for loop and iterate upto length number of items.

    This will be more clear through following code example.

    // Let's assume that we are looking for all elements with class "demo-item"
    elements = document.querySelectorAll( '.demo-item' );
    var i = 0;
    for ( i = 0; i &lt; elements.length; i++ ) {
    elements[i].style.display = "none";
    }

    Hope this helps.

  • Where to add custom code in WordPress

    Where to add custom code in WordPress

    WordPress offers a lot of features right out of the box. If you want to create a blog, you can start using WordPress without the need to add any additional plugin.

    When you want some additional functionality not provided by the core WordPress, you can find and install a plugin from the WordPress plugin repository.

    WordPress plugins repository contains thousands of plugins and in most cases, you will find the plugin for your required functionality.

    But there are cases when you do not find the perfect plugin. There may be plugins, but they are so bloated that you do not want to use them. Or, you need a very small functionality and installing a full-blown plugin with a lot of unnecessary features may seem illogical.

    In such cases, it is always better to write your own code for adding that functionality. But where to add that code?

    Where to add the code

    If you want to modify a core WordPress feature, you may be tempted to edit the WordPress core files directly. But this is not a sustainable practice as whenever WordPress will be updated, your changes would be overwritten.

    If you want to change the functionality of your current theme, you edit the functions.php file inside your theme. But again, if the theme is updated, you will lose the changes.

    In short, you must NOT edit any core WordPress files, themes or plugins. Rather, you need to add code to override or extend that functionality based on the APIs provided by WordPress.

    There are two recommended ways to add custom code to WordPress-

    • Create a child theme of your current theme and add code to its functions.php file
    • Create a custom plugin and add it to your website

    Theme vs Plugin

    WordPress has very nicely separated the design and development functionality. Themes are meant for the front-end design of the website and plugins are meant for adding functionality to the website.

    It is important to strictly follow this separation logic to ensure a clean and easy to maintain code.

    WordPress provides the functionality to add a child theme to override the current theme’s files. You can override templates and add code to functions.php file.

    But you must not add any code to a theme that is not related to front-end design. All such code should reside in plugin only. Plugins are the right place for all your non-design functionality.

    I have seen a lot of WordPress tutorials on various popular websites that encourage users to add custom code to their child theme’s functions.php file. But this approach is wrong.

    If you add your custom code to WordPress child theme, you violate the code separation logic, thus messing up your website for the future.

    Creating a small single-page plugin and adding it to WordPress is easier compared to adding a child theme. Plugins are easy to manage and you can easily create a directory structure for your code if you are creating a complex plugin with multiple functions.

    Is it safe to add custom code to my WordPress blog

    Security is a very important concern when writing code. If you are not a good programmer and somehow you leave any vulnerability in your code, it can be a huge issue for your website. To make sure that this does not happen, you should follow proper coding standards and best practices.

    If it is a small function, it is very easy to ensure that it is free from vulnerabilities. But in case you are planning for a complex plugin, make sure that you properly review your code and test the code for all possible scenarios.

    If you are a decent programmer, you can write code which is secure and clean. Though security is important, fear of security must not discourage you from creating your own plugin. It actually enhances your skill and gradually you become good at it.

    Just carefully write your code, review it properly and test it thoroughly. You can refer to security best practices for coding, you can review the code of plugins offering similar functionality or if needed, you can take an online course to improve your programming skills.

    It is not reinventing the wheel

    A lot of people tell you not to write your plugins if someone has already created a plugin with your required functionality as you will be reinventing the wheel.

    This logic does not work efficiently in the coding world. Yes, creating an entire CMS like WordPress to host your blog is surely reinventing the wheel. But, adding some code to add functionality may not be the same.

    If you are writing code to avoid installing a badly coded or bloated plugin to your WordPress blog, it is a good practice.

    If you write a good plugin which works nicely for your WordPress blog and you think that it will be beneficial for a lot of WordPress users, you may decide to release the code publicly by submitting it to WordPress plugin repository.

    This way, you can contribute back to the WordPress community and at the same time, it will help you improve your coding skills.

    Conclusion

    WordPress may be full of a lot of functionality, there may still be many things where it may fall short of your expectations. Though a lot of plugins are available in the WordPress plugin repository, you may not find the plugin which suits your requirements. This calls for writing your custom code and add it to your WordPress blog.

    Writing custom code for WordPress may be easy, but you should carefully add your code at the correct place to keep it clean and easily maintainable.

    The best way to add your custom code to WordPress is to create a plugin and add it to your WordPress blog.

    Do make sure that you follow proper coding standards and best practices. Also, do proper code review and testing to ensure that your code is safe.

  • How to create a WordPress plugin

    How to create a WordPress plugin

    In this post, you will learn how to create a simple WordPress plugin without any complex setup or need of FTP/SSH to your hosting server.

    Before we begin with this post, let us understand a few things.

    I will try to keep the code as simple as possible. My objective in this post is to help you understand how easy it is to create WordPress plugins.

    You do not need any FTP or SSH access to your hosting server. All you need is access to your WordPress dashboard with an administrator account with the ability to upload new plugins.

    No tools setup is required for creating this plugin. You can write the code in a basic text editor like Notepad which is already included in your Windows computer.

    However, I would recommend using a slightly better text editor like Notepad++ which also offers syntax highlighting, but it is completely optional.

    No FTP tool is required to upload the code. If you have one and know how to upload, you can try that, but it is not needed at all.

    WordPress is amazing

    WordPress offers amazing features right out of the box. If you want to create a blog using WordPress, it is as easy as installing software on your Windows computer. There is no coding required.

    WordPress makes it so simple. It is a complete blogging system with everything in place to write your next awesome blog.

    Let us take a look at some of the basic features of WordPress supported out of the box-

    • Create posts, classify them with categories and tags
    • Upload and manage images, videos, etc. using its built-in media library
    • Define the URL structure of your choice using permalink settings
    • A simple yet fully functional comment system with dedicated comment management dashboard
    • Thousands of free themes to change your blog’s appearance with just a single click
    • Thousands of free plugins to add any additional functionality

    There are many more features that I cannot list here, but you got the idea. WordPress is a complete powerhouse for bloggers helping them focus on their content rather than worrying about managing the technicalities.

    Why plugins

    No matter how comprehensive a particular software is, there may be innumerable cases where some additional functionality is required. The same is the case with WordPress. Though most of the blogging features are included in the core, there may be situations where additional functionality is needed. That’s where WordPress plugins come into the picture.

    For example, if you need to add your copyright text in the page footer, you can find and install a plugin that offers that functionality. The plugin may also add settings page to your WordPress dashboard to allow you to configure the plugin settings.

    But, what if the plugin you found includes 10 more features which you do not need. Though it will work for you, it will add bloated code to your blog by adding unnecessary additional features which are of no use to you.

    In such a scenario, a good option can be to create your plugin. Yes, it is very easy and a much better option if you want to add a small functionality to your WordPress blog.

    Before we dive into creating the plugin, there is one thing you need to know- WordPress Hooks.

    What are WordPress Hooks

    As the name suggests, hooks are small checkpoints within the WordPress code where you can inject your functionality. You can just write a function and connect to the hook and your function will be called every time the hook is executed by WordPress.

    For example, WordPress defines a hook called wp_footer‘ which is called by WordPress when it renders the page footer. You can connect your code with this hook to print your copyright notice in the footer.

    Hooks are of two types-

    1. Action hooks
    2. Filter hooks

    Action Hooks

    Action hooks are mainly for executing some code and print it. For example, I already told you about wp_footer. It is called during the creation of page footer during page load and you can print anything you want to the footer by hooking your function to this action hook.

    You can also use an action hook to execute some code that has to be executed on each page load. For example, wp_init is an action hook that is executed when WordPress loads the required data before rendering the page. You can hook into this to execute anything you need before the page is sent back to the user.

    All you have to do is create a function and tell WordPress to call it whenever wp_footer is executed.

    Filter Hooks

    Filter hooks are useful if you want to manipulate or modify data within the WordPress functions. For example, the_content is a filter hook that filters the post content to be printed in the post or page. You can hook into this filter, and it will pass the content string to your function. You can modify this value and return the new value which will be taken by WordPress to print the final content on the page.

    This understanding is enough to create your first plugin. I will discuss the code in the next section.

    The Plugin

    We have got a good understanding of WordPress hooks. Now, using this knowledge, we will create a small plugin. To keep things simple, our plugin will simply add some text to the footer of our WordPress blog.

    A WordPress plugin can be a single file or it can be a directory with a bunch of files. To keep things simple, our current plugin will be of a single page, with all the code in the same file.

    First of all, we need to select a unique name for our plugin file which must not be a clash with the name of any other plugin in the WordPress repository. To ensure that there is no clash, we will prefix our plugin name with our blog’s name. A good file name can be webrosis-footer-printer.php.

    You can use the prefix of your name, blog or company. The file name is completely your choice.

    Create a file with this name and open it in a text editor.

    Every WordPress plugin index file (in case of a directory) or main file (in case of a single-page plugin) must contain header comment with specific header fields as defined by WordPress.

    WordPress uses the details provided in this header comment to display plugin’s information in the installed plugins list in the WordPress dashboard.

    In the header comment, it is mandatory to define "Plugin name". Everything else is completely optional. As an example, below is a header comment which I have created for our plugin. You can replace the values with your own.

    <?php
    /**
     * Plugin Name:       Webrosis Footer Printer
     * Description:       Prints custom content in footer
     * Version:           1.0
     * Author:            Abhineet Mittal
     */

    There can be more header fields, but for now, this seems enough for our plugin.

    The Code

    We want to print our custom content to page footer. So, we will hook into ‘wp_footer’ action hook.

    We will first write a function to print our custom content and then hook it to wp_footer action through `add_action’ function.

    // Function to print copyright notice in footer
    function webrosis_print_content_in_footer() {
        echo 'The content on this website is copyright protected. Do not copy. All Rights Reserved.';
    }
    // Now hook this function to wp_footer action
    add_action( 'wp_footer', 'webrosis_print_content_in_footer' );
    

    Save the file.

    That’s it. This is the only code you need to write. When added to your WordPress blog, this plugin will print the given content in the page footer.

    Here is the complete code-

    <?php
    /**
     * Plugin Name:       Webrosis Footer Printer
     * Description:       Prints custom content in footer
     * Version:           1.0
     * Author:            Abhineet Mittal
     */
    
    // Function to print copyright notice in footer
    function webrosis_print_content_in_footer() {
        echo 'The content on this website is copyright protected. Do not copy. All Rights Reserved.';
    }
    // Now hook this function to wp_footer action
    add_action( 'wp_footer', 'webrosis_print_content_in_footer' );

    This plugin will not add any configuration settings to your WordPress dashboard as we have not coded that. However, once you start writing plugins, you can learn about the WordPress Settings API to add your custom settings page in the WordPress admin dashboard.

    Installation

    You have created your first plugin. Now its time to add it to your WordPress blog. Use the following steps-

    1. Zip this plugin file
    2. Go to your WordPress blog dashboard and click on "Plugins > Add New"
    3. Upload the zipped file of your plugin
    4. Now activate the plugin by clicking on "Activate"

    If you have done everything till now exactly as I told you, the plugin will be successfully activated.

    Now go to any post or page on your blog frontend and you will find that your content has been added to the footer.

    Congratulations! You have successfully created your first WordPress plugin.

    So, you saw how amazingly simple it is to create a WordPress plugin. If you want to add small functionalities, it is better to write your small functions and add them to your plugin.

    Your plugin can only be installed by uploading the zipped file. It will not be available in the WordPress plugins repository until you submit it.

    I have not covered uploading the plugin in the WordPress repository as it is a separate process and requires many more steps. At this level, you must first practice writing plugins. Once you start writing useful plugins, you may consider submitting them to the WordPress plugins repository to be used by the community.

    Way forward

    In this post, you have learned how to create a WordPress plugin. But our example was a very simple one as it was just to explain to you how a plugin works.

    To create more meaningful plugins, you can read about other filters and API functions provided by WordPress. A good starting point is WordPress Documentation.

    Here are a few simple ideas which you can implement in your plugin-

    • Add Google Analytics code by hooking into wp_head action
    • Add beautiful author box below the content of your posts by hooking into the_content filter
    • Modify the title of your pages by hooking into ‘wp_title’ filter

    You can think of many more ideas as per your blogging requirements.

    Conclusion

    We created a very simple WordPress plugin that printed some custom content in our blog’s footer. It showed, how easy it is to add small functionalities to your WordPress blog by adding simple code in the form of plugins.

    Thanks for reading. I hope you found this post useful.
  • How to use PHP built-in web server

    If you are a PHP developer, chances are you have already set up a web server (WAMP or LAMP software) on your desktop. It gives you the ability to test your PHP code locally rather than testing it on a remote server.

    But what if you are working on a machine where you do not have a web server installed? Or, you may not have sufficient permissions to install the webserver on a desktop.

    Luckily, PHP provides a way out of this situation. PHP has a built-in web server that can be run directly without the need for any setup or installation.

    Some assumptions

    For this tutorial, I am making the following assumptions-

    1. My first assumption is that you are on a Windows machine, but you can implement this on any system by downloading appropriate PHP files.
    2. My second assumption is that your website is in the following folder in your desktop- F:projectsmy-php-website. You may change it to the appropriate folder of your website.
    3. My third assumption is that there is a valid index.php file in your website root folder

    How to run the PHP built-in web server

    1. Download PHP for Windows.
    2. Unzip it and save it on your desktop- F:projectsmy-php-websitephp
    3. Now press, type cmd, and press enter, to open your command prompt
    4. Now navigate to your website’s root folder using this command- cd f:projectsmy-php-website
    5. Now execute this command to run the webserver pathtophpphp.exe -S localhost:4000

    It will immediately fire up the PHP web server. You can type localhost:4000 in your web browser and it will run your index file.

    That’s great! Such a convenience without the hassles of setting up an entire web server. You can run any number of instances of this server. It is single-threaded and has its limitations, but it is sufficient for running the PHP website test code.

    You can also make changes to the PHP configuration by editing the php.ini file. You can also add/remove PHP modules.

    URL Rewriting and routing

    There is one important feature missing in PHP built-in server- URL Rewriting. Suppose you have URL rewriting for pretty permalinks enabled in your website and you want to test that functionality locally.

    Apache webserver provides the capability to add the .htaccess file to implement URL rewriting. In the PHP server, you can implement similar functionality by setting up a router.php file.

    Add a router.php file to your website root and add the following code-

    // router.php
    
    // Get the url path and trim leading slash
    $url_path = trim( $_SERVER[ 'REQUEST_URI' ], '/' );
    
    // If url_path is empty, it is root, so call index.html
    if ( ! $url_path ) {
        include( 'index.html' );
        return;
    }
    
    // If url_path has no dot, it is a post permalink, so add .html extension
    if( ! preg_match( '/[.]/', $url_path ) ) {
        include( $url_path . '.html' );
        return;
    }

    This code takes the path from URL and rewrites requests for HTML files to call them without .html extension. You can implement any functionality you want.

    Do remember, adding router.php will give the responsibility of adding the entire response on your shoulders. So, if you are including static files like style files with .css extension, you will have to handle that as well.

    // Get the url path and trim leading slash
    $url_path = trim( $_SERVER[ 'REQUEST_URI' ], '/' );
    
    // In case of css files, add the appropriate header
    if( preg_match( '/[.css]/', $url_path ) ) {
        header("Content-type: text/css");
        include( $url_path );
        // You can do the same for other file types as well
    }

    Now, go to the command line. If your PHP server is already running, press ctrl+c to stop it. Run this command-
    pathtophp.exe -S localhost:4000 router.php
    Now, again open the localhost:4000 in your web browser. It will now execute your router.php file and which, in turn, will include the required PHP files.

    This technique will save you time if you quickly need to check your code.

    Limitations of PHP built-in server

    PHP built-in server is a useful tool for developers. However, it has its limitations.

    1. It is single-threaded. That means if a request is blocked, the server will stall the execution.
    2. Once you start adding more logic to your router.php file, it will soon become cluttered. It is very difficult to scale it for large projects.
    3. There is no SQL support. You can either use SQLite, which is a good option or install a separate SQL server.

    Conclusion

    Despite its limitations, PHP built-in web server is a useful tool for web developers. It helps in saving time in many situations and makes code testing, an easy task.

  • Enable Gzip compression in WordPress with htaccess

    With the advancement of web technologies, you have ready-to-use frameworks for any functionality you want to add to your website or WordPress blog. Just include these framework files to your website and add its features through their easy to use API.

    For example, if you want readymade styling for your website, you can use CSS frameworks like Bootstrap or Foundation. Similarly, a lot of Javascript libraries are available to add advanced features to your website, without needing you to code complex functions.

    Using these frameworks, developers can create fully functional websites in a short time. All they have to do is to include the framework files to their HTML page, then use its functions to implement the desired functionality.

    Similarly, these days, people are more oriented towards visual data. It has become necessary to add a lot of images and videos to their content to attract and engage users. Many times, they also include custom-developed CSS and JS files in addition to all the other resources.

    Though this makes the websites better in terms of functionality and aesthetics, adding all these files makes the webpage very heavy and negatively affects the website performance.

    In a lot of WordPress themes, each page load requires dozens of additional scripting and styling files in addition to the already included media files.

    When a user opens such a website in their browser, the browser immediately starts downloading all the resources from the requested web page and render it for the user. It may include stylesheets, script files, images, videos, etc.

    Each request to such files increases the page load time as the user has to wait for the resources to get downloaded. If you have multiple files with huge sizes, it adversely affects your site performance.

    Now, if the user is on a high-speed internet connection, this may not be a problem at all. But, you cannot assume that all your users are accessing your website through the best internet connections.

    As a simple WordPress user, you may have downloaded or purchased an excellent theme for your blog. You may like the functionality of that theme, but the extra file requests are slowing down your website.

    You may not know how to optimize the theme through coding. But, you can optimize your blog for better performance through some simple tweaks at the server level.

    Two things can be done to improve your WordPress blog performance. They are browser caching and Gzip compression. You can do this at the server level by simply adding some configuration code to .htaccess file in your website root folder.

    Browser Caching ensures that your static resources are cached by the user browser to avoid multiple requests of the same file on different pages. The user will save on bandwidth, and the site load speed will improve.

    I have already written a post about Browser Caching where I have provided the required configuration.

    Let’s take a look at Gzip compression in this post. Gzip compression speeds up your WordPress website by compressing the resources at the server level using simple .htaccess configuration in Apache server.

    Gzip compresses the files to reduce payload. It even compresses the minified CSS and JS files to smaller sizes.

    Just add the following code to your .htaccess file.

    # BEGIN Compressing
    
    # Compress HTML, CSS, JavaScript, Text, XML and fonts
    AddOutputFilterByType DEFLATE application/javascript
    AddOutputFilterByType DEFLATE application/rss+xml
    AddOutputFilterByType DEFLATE application/vnd.ms-fontobject
    AddOutputFilterByType DEFLATE application/x-font
    AddOutputFilterByType DEFLATE application/x-font-opentype
    AddOutputFilterByType DEFLATE application/x-font-otf
    AddOutputFilterByType DEFLATE application/x-font-truetype
    AddOutputFilterByType DEFLATE application/x-font-ttf
    AddOutputFilterByType DEFLATE application/x-javascript
    AddOutputFilterByType DEFLATE application/xhtml+xml
    AddOutputFilterByType DEFLATE application/xml
    AddOutputFilterByType DEFLATE font/opentype
    AddOutputFilterByType DEFLATE font/otf
    AddOutputFilterByType DEFLATE font/ttf
    AddOutputFilterByType DEFLATE image/svg+xml
    AddOutputFilterByType DEFLATE image/x-icon
    AddOutputFilterByType DEFLATE text/css
    AddOutputFilterByType DEFLATE text/html
    AddOutputFilterByType DEFLATE text/javascript
    AddOutputFilterByType DEFLATE text/plain
    AddOutputFilterByType DEFLATE text/xml
    
    # END Compressing

    This code ensures that Apache will compress all the files using Gzip before sending them to the user.

    Once you implement this code, check your page speed using Google Page Speed Insights tool. You will notice the improvement in your page speed score.

    Even if you are not facing website speed issues, you must implement Browser Caching and Gzip Compression on your website. It is recommended by Google & widely supported by most browsers.

  • Correct file permissions for WordPress on Apache

    File permission is a simple yet complex issue. If you manage a website, you need to ensure that the file permissions are adequate so as to allow users to perform operations on the file and at the same time, you need to ensure that file permissions are strict enough to prevent security and hacking incidents.

    Wrong permissions will break your automatic updates. Also, if you run composer, you may struggle as composer should not be run as root or sudo user, and non-root user would need read/write permissions to run composer.

    This situation usually arises when you run a website on a self-managed server like the one provided by DigitalOcean or Amazon AWS Lightsail. However, the permissions are equally valid for managed or shared hosting where the host has provided you the SSH access to your files.

    In this article, I have provided simple file permissions for your WordPress website hosted on Apache server. These permissions should be sufficient for most of your websites, including those which are not built on WordPress.

    Giving the correct file permissions to your WordPress website

    To begin with, Apache server runs all the processes requires to read/write the website files & directories. So, we need to provide the ownership of the website files & directories to Apache. As Apache runs as www-data, following command is appropriate to give ownership of your entire website folder to www-data user and group.

    In your SSH terminal, run the following command.

    sudo chown -R www-data:www-data /var/www/wordpress

    Here, I am assuming that your wordpress website root is /var/www/wordpress. You can change it to the directory in which your website is hosted.

    Now, we need to give all file permissions (read, write, execute) to owner (Apache server) because server needs to perform read/write operations on files & directories. It will ensure that our website runs smoothly without error.

    Giving read/write permissions to www-data is fine for your website to run and auto-update without any errors. But, if you try to SSH into your server as a non-root user, you will not be able to read/write your files inside the wordpress directory.

    Also, if you use composer, you need read/write access to website files. As per composer’s official documentation, it is recommended that you should NOT run composer as root or sudo user. You should run composer as non-root user. Same is true for other utilities as well which require read/write permissions in your wordpress directory. This means we need more permissions.

    For this, I am assuming you have already created a new user with sudo privileges and have logged in through that sudo user (not root use).

    First, add you to the www-data group using the following simple command in your SSH terminal. Remember, you must be logged in as a non-root user, with sudo privileges, as whom you want to run composer.

    sudo adduser $USER www-data

    Above command adds you to www-data group.

    Now give read/write/execute permissions to all the files and folders to both owner and group.

    sudo find /var/www/wordpress -type d -exec chmod 770 {} ;
    sudo find /var/www/wordpress -type f -exec chmod 660 {} ;

    Update: Recently I was facing following error while running these commands-

    `find: missing argument to -exec'

    I fixed that by adding a slash before the terminating semicolon.

    So, the update commands are-

    sudo find /var/www/wordpress -type d -exec chmod 770 {} \;
    sudo find /var/www/wordpress -type f -exec chmod 660 {} \;

    You need to log out and log in again for the new permissions to take effect.

    That’s it. You now have the correct permissions.

    How to check if your WordPress website has correct file permissions

    After setting up file permissions, you must validate the new file permissions. To check this, try the following two things-

    • Run composer and check if there is any permission error.
    • Try uploading a file in the WordPress media library.

    If you are able to execute the above two operations successfully without error, your WordPress website has the correct file permissions.

  • Customize your link preview on Facebook

    When you share a link to your post on Facebook or Twitter, it automatically generates a preview card with a title, description, and optional image. This preview helps your post visibility by presenting it in an attractive manner to other users.

    This preview can be customized for all our pages using Open Graph Protocol (OGP) created by Facebook. Twitter supports this protocol adding a few tags of its own as well. In this post, I will discuss the required meta tags to customize your link preview.

    In this article, based on the Open Graph Protocol, I will tell you the exact tags to be added in the head section of your blog. This will transform your posts into rich social objects on Facebook, Twitter etc.

    What is Open Graph Protocol

    Open Graph Protocol is a schema to assign properties to a web page which can be easily understood by the compliant applications. Open Graph Protocol is implemented through meta tags in the head section of HTML web page and is loosely based on other existing schema technologies.

    Open Graph Protocol provides different meta tags to be added to your page to customize the different elements of a web page as well as to define a lot of other properties for that page.

    Though we can add all the tags defined in the Open Graph Protocol for a webpage or blog post, it will be redundant and will add to extra code. So, in this post, we will look at the basic required meta tags which will be sufficient for your customized link previews on Facebook & Twitter.

    Customizing a link preview

    If you look at your link preview of a post you shared on Facebook or Twitter, you will observe that there are three important elements-

    • Title
    • Short Description
    • Image

    These are the visible elements which are needed in a link preview. Apart from these, there are two more properties, which are type and url.

    Type defines the type of web page. For blog posts and news articles, it is ‘article’. Url is the canonical url of the object. This acts as a unique id for the object in the entire graph. In case of multiple pages sharing same data like comment pages on a blog post, this url remains same.

    Apart from this, Facebook requires you to add their FB App ID in another meta tag. As described in my previous post on the topic Social Sharing Buttons, you can easily get your Facebook app id from your Facebook for Developers dashboard.

    In case of Twitter, though it defines it’s own tags, it officially supports the Open Graph Protocol as well. So, if you add separate Twitter meta tags along with Open Graph tags, Twitter tags will be redundant. So, in the interest of keeping our code concise, we will only add those Twitter tags, which are not covered by Open Graph Protocol.

    Twitter only requires one extra meta tag, ‘twitter:card’, which we will add in our code.

    Let’s take a look at the final code.

    <meta property="og:type" content="article" />
    <meta property="og:title" content="Title of your page">
    <meta property="og:description" content="Description of your page">
    <meta property="og:image" content="Image/url/of/your/post's/featured/image">
    <meta property="og:url" content="Canonical/url/to/your/page">
    <meta property="fb:app_id" content="Your_FB_App_ID" />
    <meta property="twitter:card" content="summary_large_image">

    You can see that "og:type" and "twitter:card" tags are static and will remain the same for all blog posts. "fb:app_id" will also remain the same if you are using same app id for entire website.

    You will have to modify four tags as per your post data- "og:title", "og:description", "og:image", "og:url".

    Paste these tags in the head section of your HTML page. Your page is now rich social object.

    Sometimes Facebook or Twitter fetches wrong values for these tags, or sometime they may not even able to fetch any data. Also, you may have changed the post title, description or image after the page has been fetched by Facebook/Twitter. As Facebook & Twitter cache their data for many days, you may not be able to see the updated data when you share that link.

    In such cases, you may use the Facebook Sharing Debugger which shows how Facebook looks at the Open Graph Meta of your page and shows you the open graph data currently saved by Facebook for your post. It also allows you to force Facebook to fetch the data again, in case, there is a discrepancy.

    What happens when there are no Open Graph meta tags on your page

    If there are no Open Graph meta tags on a page, Facebook tries to get that data automatically based on page content. Usually, the title of the page is taken as title. Description is taken from the description meta tag, if available. Otherwise, it takes first few lines from the content. Similarly, the first image found on the page which is larger than 200×200 pixels id taken as image.

    There is no confirmation that in the absence of Open Graph meta tags, Facebook will take only these values. It can take any value as defined by their fetching algorithms. So, to avoid this uncertainty, it is always advised to add the above seven meta tags to all your web pages.

    Conclusion

    So, you can see that Facebook’s Open Graph Protocol is currently kind of a universal protocol to define social properties of a web page. It is supported by Twitter and many other social networks.

    It is very easy to implement as it requires adding only seven basic tags. You can add many more tags by referring to the Open Graph Protocol Documentation.

    So, don’t wait anymore. If you have not yet implemented the Open Graph meta tags in your blog or website, it is important that you do it now.

  • JSON-LD: Add Structured Data to improve SEO

    JSON-LD: Add Structured Data to improve SEO

    Adding structured data like JSON-LD to your blog or website is a very important search engine optimization (SEO) technique. It helps Google to understand your content better and helps your website to get a better search ranking.

    What is Structured Data

    Structured data is a standard format to add information to a page which can be easily understood by search engines to identify the content of the page. For example, if you have a cooking blog, Google needs to understand if a particular page is for recipe and if yes, it needs to extract key information from that page to match with the user query. Structured data helps Google by directly providing this information.

    Structured data is comprised of predefined properties which are based on schema.org.

    There are multiple formats to add structured data to your website. The three most popular formats which are supported by Google are-

    • JSON-LD
      This is a subset of JSON where all the properties are defined in the head section of an HTML page.

    • Microdata
      In the Microdata format, structured data properties are nested within HTML content by using HTML tag attributes.

    • RDFa
      Similar to Microdata, RDFa uses HTML tag attributes which are officially HTML5 extension.

    Out of these three, Google recommends using JSON-LD for structured data whenever possible.

    So, our focus in this post will be only on JSON-LD. There is no use to add multiple structured data formats. One structured data format implemented efficiently is enough for Google to understand the key information provided by our content.

    JSON-LD is the easiest to implement among all other structured data formats as it is consolidated at a single place in the head section. Also, the JSON structure is easy to create either manually or through programming making it very fast to implement. The cluttered approach of Microdata & RDFa is something which actually results in errors in implementing structured data. JSON-LD is free from all that mess.

    The content on internet is mainly written in the form of blogs containing a lot of blog posts. So, in this article, I will tell you how to implement JSON-LD for a blog post.

    Though, schema.org provides a large number of properties for each page type, it is not necessary for you to implement all those properties. A few important ones are enough.

    Implementation of JSON-LD in a Blog Post

    First of all, let’s take a look at the complete JSON-LD snippet to be added to the head section of a blog post. Then, I will explain each property. Most of the properties are self explanatory.

    <script type="application/ld+json">
    {
      "@context": "https://schema.org",
      "@type": "BlogPosting",
      "headline": "Enable browser caching on Apache server using htaccess",
      "description": "Browser caching for all types of files can be easily done using Apache's .htaccess file. This simple configuration results in a faster website, less consumption of bandwidth and better user experience.",
      "mainEntityOfPage": "https://webrosis.com/enable-browser-caching-apache-server-htaccess",
      "image": "https://webrosis.com/assets/images/logo.jpg",
      "datePublished": "2019-08-06",
      "dateModified": "2019-08-06",
      "author": {
        "@type": "Person",
        "name": "Abhineet Mittal",
        "description": "Abhineet is IIM Alumnus and Founder of popular Digital Publishing Platform, Sahityapedia. He is a technology enthusiast by hobby &amp; an avid reader.",
        "image": "https://webrosis.com/assets/images/logo.jpg",
        "url": "https://webrosis.com/about"
      },
      "publisher": {
        "@type": "Organization",
        "name": "Webrosis.com",
        "logo": {
          "@type": "ImageObject",
          "url": "https://webrosis.com/assets/images/logo.jpg"
        }
      }
    }
    <script>

    In this code, I have taken JSON-LD from one of the blog posts of this blog. Let’s discuss each element used in this code.

    • The entire JSON-LD snippet has to be wrapped inside <script type="application/ld+json"> and </script> tags.
    • @context is standard and should be used as-is.
    • The most relevant type for a blog post in schema.org is BlogPosting. So, we will use that for @type.
    • Headline is the page title. This title will be visible on the Google search results page.
    • Description is a short summary of the page, and like Heading, it will be visible on the Google search results page.
    • mainEntityOfPage defines that the topic discussed is the primary topic for this page. That means it has to have canonical URL.
    • Image is URL to featured post or thumbnail of this post.
    • datePublished & dateModified are self-explanatory.
    • Author adds nested properties to define a Person. Add your name, description (biography), image and URL.
    • Finally, Publisher is similar to Author, but it indicates an organization and must have name and logo properties.

    Interestingly, according to schema.org, Publisher can be either Person or Organization. But Google only accepts Organization as a Publisher. So, do not use Person there.

    Finally, you can validate your schema using Google Structured Data Testing Tool. If you see any error, try to fix it based on the comments provided by Google.

    And that’s it. Your blog posts are now SEO ready which can be easily understood by Google.

    Make sure you do not stuff structured data with unrelated content. Structured data should clearly describe the actual content in the blog post. Doing otherwise, will hurt your search ranking as Google’s algorithm’s are smart enough to notice any discrepancies.

    When all this is done, wait for a few days and observe the change in your search rankings. Properly implemented structured data will definitely boost the search ranking of your blog bringing in more traffic.